Baseline Knowledge
SVG Tutorial
Raster Graphics
Images can fall into one of two categories. Images can be raster graphics or vector graphics. Most people are familiar with raster graphics. In a raster graphic, the file contains information describing how each pixel is colored. JPG, PNG, BMP are all examples of raster graphics. With these formats, the image file is a binary format containing the information needed to draw the image. A raster graphic file describes how each individual pixel should be rendered. Because of this, when you want to make changes to a raster based image, the changes occur at the pixel level. If you’ve ever used an image editing program, such as Photoshop, when you have zoomed in on the image, you’ve seen the individual pixels. This is called pixelation. Making changes to a raster graphics image requires making changes at the pixel level. Imagine how difficult it would be to specify a color change in a line? While there are tools that make this easier, raster graphics doesn't lend itself to making easy changes to graphical elements.
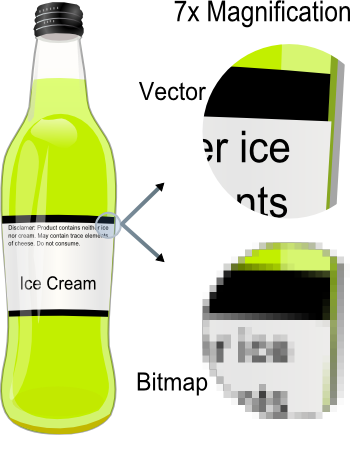
Vector Graphics
Vector graphics work in an entirely differently manner. With vector graphics, the image file contains text instructions for drawing the image. Because the drawing instructions are in a readable text format, if you know the structure and syntax of the vector graphics file format (such as SVG) it’s possible to use a text editor to change the image. Whereas with a raster image you would need an image editing program to make changes to the image.
There are two main advantages vector graphics over raster images.
The first is that when zooming in on a vector graphic, there is no pixelation. This is because vector graphics provide general instructions on how an image should be rendered.
The second advantage of vector based graphics is that the structured syntax allows the user to make changes to an entire graphical element. For example, imagine you had a raster graphic line
In order to change the color of this line, you would need to use an image editor and use the fill tool. This may or may not work, depending on whether there was interpolation between the line and the background.
If this same line was drawn using a vector graphics framework, such as SVG, changing to the line could be done in the syntax. We'll show you how this is done in the next section.
What is SVG?
Scalar Vector Graphics is an open web standard that uses a structured text format (XML) for rendering vector graphics.
The most basic SVG file contains the following format:
--Size of the viewport (Think of this as the image resolution)
--Grouping instructions via the
--Drawing instructions using the shapes elements
--Style specifications describing how each element should be drawn.
SVG uses common graphical elements such as lines (SVG calls them paths), circles, rectangles, polygons to render images. SVG provides a framework for customizing graphical elements. For example, when using the <circle> SVG element the user can specify:
--The center point of the circle
--The width of the line (stroke-width) used to draw the circle
--The color (stroke) of the line used to draw the circle
--The fill color of the circle
--The transparency of the lines
These changes are commonly called styles. Styling is done using CSS syntax.
There are many more attributes and styles. While most are general across all elements, some are specific to certain SVG elements. You can find links to SVG resources that go into more details about the various attributes and styles in our link section.
A Simple SVG Example
This is the code from an SVG file that draws a single line.
  <?xml version="1.0" encoding="UTF-8" standalone="no"?>

  <svg
    xmlns:dc="http://purl.org/dc/elements/1.1/"
    xmlns:cc="http://creativecommons.org/ns#"
    xmlns:rdf="http://www.w3.org/1999/02/22-rdf-syntax-ns#"
    xmlns:svg="http://www.w3.org/2000/svg"
    xmlns="http://www.w3.org/2000/svg"
    version="1.1"
    width="700"
    height="1000"
    id="svgExample">
  <defs id="mydefinedLineID" />

  <g id="horz_line">
    <path
      d="M 100 100 L 300 100"
      id="myPath"
      style="fill:none;stroke:#000000;stroke-width:1px;stroke-opacity:1"/>
  </g>
  </svg>
Explanation of SVG Code
In this example width and height specify the size of the viewport. This code creates a 700x1000 (pixels) image.
Several identifiers (selectors) are provided for use in the DOM. An identifier is given for the entire SVG image (id = ”svgExample”). The use of selectors is explained in the DOM and selections portion of this tutorial.
The <g> element is used to group a graphical elements together. Grouping allows for the ability to change styles to a set of graphical elements. In other words, if you had a group of <path> elements, it's possible to set the style for the entire group, rather than each individual path.
id=”horz_line” is the selector for all the elements drawn in the <g> tag.
<path> element lets the computer know that a path (line) will be drawn. After the <path> element, the specific instructions for drawing the are provided. These instructions are contained in a string listing the coordinates of the starting and ending point of the line. The path instruction string will always beging with "d=".
This line of code
d="M 100 100 L 300 100"
can be read as
M tells the computer to move the cursor to the position (100,100).
L tells the computer to draw a line from the current position to the position (300,100).
This line of code styles the line.
style="fill:none;stroke:#000000;stroke-width:1px;;stroke-opacity:1"
- fill:none - When paths are used to draw a single line, fill is irrelevant. Otherwise, it's used to set the fill color.
- stroke:#000000 - Sets the path color to black
- stroke-width:1px - Sets the line width to 1 pixel
- stroke-opacity:1 - Sets the line to be opaque or have zero transparency.
Extending the Simple SVG Example
A square could be easily drawn by extending the previous code to draw three additional lines.
Here's the relevant SVG that was changed to draw the blue square.
  <path
    d="M 100 100 L 300 100 L 300 300 L 100 300 L 100 100"
    id="myPath"
    style="fill:blue;stroke:#000000;stroke-width:1px;;stroke-opacity:1"
  />
These are the lines used to draw a square.
L 300 100: Draws the top side
L 300 300: Draws the right side
L 100 300: Draws the bottom side
L 100 100: Draws the left side
In addition fill:blue was set blue.
SVG Elements (Shapes)
Although it's possible to draw shapes using <path>, SVG provides a set of basic shapes that makes drawing common shapes a lot easier.
Some common elements are:
<rect> To draw a rectangle, position, height and width must be specified.
<circle> To draw a circle, the center point coordinates (cx,cy) and radius (r) must be specified.
  <circle cx="100" cy="100" r="100" fill="black"
    stroke="blue" stroke-width="5"  />
The code aboves draws a black filled circle at (100,100) with a radius of 100 pixels.
<ellipse> To draw an ellipse the center point (cx,cy), x-radius (rx) and y-radius (ry) must be specified.
You can read more about the basic shapes on the W3 website.
How does this work with D3?
D3 uses SVG to create and modify the graphical elements of the visualization. Because SVG has a structured form, D3 can make stylistic and attribute changes to the shapes being drawn. To illustrate this point, in the previous example, filling the square was simply changing “fill:none” to “fill:blue”.
Or another example
A circle can be be changed in size by adjusting the radius
  <circle cx="100" cy="100" r="100" fill="black"
    stroke="blue" stroke-width="5"  />
  <circle cx="100" cy="100" r="200" fill="black"
    stroke="blue" stroke-width="5"  />
With D3 the user makes stylistic changes through function calls. D3 provides a lot of functionality for making style and attribute changes to SVG elements. In D3 it's possible change a graphical element's position, size, or color based on mouse events or the data itself.
It’s possible to have this circle change color, size, or position if it’s moused-over or clicked on. The ability to bind this sort of functionality to the elements being drawn on screen allows for immense interactivity.
In order to manipulate SVG elements, D3 uses selectors to target specific components of the document for change. We'll cover selectors in the following sections.
Recap
--SVG is a framework for creating vector graphics using a structured syntax.
--SVG has tags for creating basic shapes: <rect>, <circle>, <ellipse>, <path>, <polygon>
--SVG basic shapes are called elements
--SVG elements can be customized through the style string
--D3 uses SVG for generating and modifying graphical elements
--D3 can modify an SVG element through D3 function calls

JavaScript for d3
Javascript is a lightweight programing language that is widely used on the web. It was designed to allow interactivity with HTML websites. Before getting started with Javascript you should have some basic experience with HTML and CSS. Javascript is important to know for using d3 as it is a Javascript library and d3 code is written in Javascript.
Syntax
Javascript code can simply be inserted into any HTML page, and it is denoted by the script tag as shown below:
  <script type=”text/javascript”>
    document.write(“<h1>Heading is here!</h1>”);
  </script>
In the above example we can see that the Javascript simply sets the header to “Heading is here!” This is not a very complex or interesting Javascript, but it is useful for demonstrating the basic syntax.
Variables in Javascript are all specified by simply preceding them with the keyword “var.” Such as in the example below, we first initialize the variable in the first line, and then we give it a value in the second.
  var y;
  y = 15;
If - Else statements are used to run a specific set of code only when a particular condition evaluates to true. This condition is placed in parenthesis immediately following the “if” statement and if this condition is true then the code encapsulated in the brackets following the “if” statement are executed. Otherwise if the condition evaluates to false then the code in the brackets following the “else” statement are executed.
  if (y = 10){
    document.write(“Y equals 10”);
    }
  else {
    document.write(“Y does not equal 10”);
    }
Both for and while loops will prove to be quite useful as they allow you to execute a particular code segment a specific number of times for the former, or while a specific condition is true for the latter. In the for loop a variable is created and then incremented to a pre-defined threshold (in this example “stop”) at which point the loop will stop executing.
  var stop = 10;

  for (y = 0; y<=stop; y++){
    document.write(“Lets count to 10: “ + y);
    }
Javascript code will execute when the HTML page is first loaded unless a the code is put into a function.
Functions
Functions are used in Javascript when you want a particular code fragment to execute not when the HTML page is loaded, but in response to some event, such as a mouse click. A function is defined by simply typing the keyword “function” and then a specific name for the function, in the below example “displaymessage.” If your function relies on some external variables that it requires then they can be specified within the parenthesis at the end, these are called parameters.
  function displaymessage()
    {
      alert("Hello World!");
    }
The function in then called in later code in response to some event, in the below example from the click of a button in the HTML page.
<input type="button" value="Click me!" onclick="displaymessage()" />
Objects
An object in programing is a specific type of data that has properties and methods. For example, if one were to write a program for an apple orchard, your program may need to store specific information about some bushels of apples. When they were harvested, and what type they are would both be different properties of the object “apples.” While actions to be done with the apples, such as selling them to a distributor or dividing a specific bushel of apples into smaller ones would be the methods.
There are many types of objects that come built into Javascript, such as Strings, Arrays, and Boolean's. Strings are used to store text and have several methods that can be performed on them, such as toUpperCase which will change all the letters to their uppercase equivalents. An Array is a type of object that can hold multiple values at the same time, and values that make up an Array are called elements. These elements are accessed based on their index or position in the Array. Booleans are simple True/False data types which can make using condition based techniques (such as if-else statements and while loops) much cleaner.
  var test = “This String is :”;
  document.write( test + test.length + “ characters long”);
The above code fragment would print: “This String is :16 characters long”
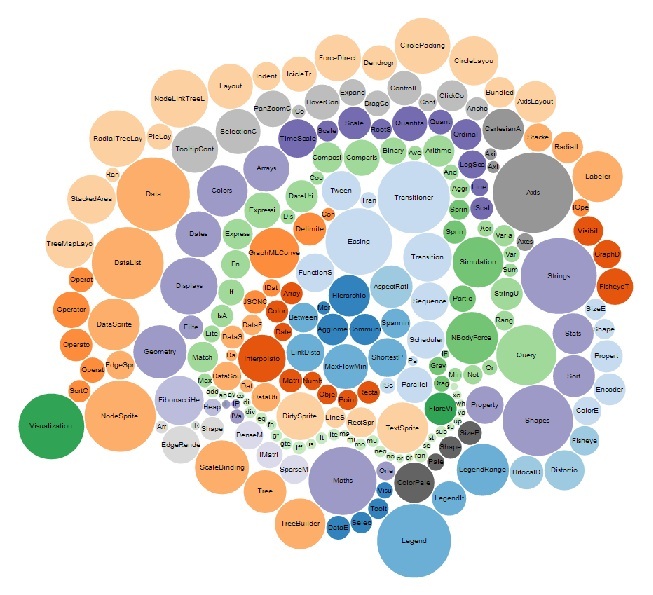
Javascript in a d3 example:
The following visualization is directly from the d3 example page. This is a Bubble chart design which uses circle area to encode data.
 source:http://mbostock.github.
Below is a code snippet of d3 code used to implement this visualization (not including source files). You can see that it is all written in Javascript code. There are several variables declared, such as data path and countries. There are methods that are then called on these objects, one which is very common is the “.attr()” to change the objects attributes. You can also see how the function “quantize” is defined in line 36 and called back on line 33.
1   var data; // loaded asynchronously
2
3   var path = d3.geo.path();
4
5   var svg = d3.select("#chart")
6     .append("svg");
7
8   var counties = svg.append("g")
9     .attr("id", "counties")
10    .attr("class", "Blues");
11
12  var states = svg.append("g")
13    .attr("id", "states");

			...

30  d3.json("unemployment.json", function(json) {
31  data = json;
32  counties.selectAll("path")
33    .attr("class", quantize);

34    });
35
36  function quantize(d) {
37    return "q" + Math.min(8, ~~(data[d.id] * 9 / 12)) + "-9";
38    }
DOM
What is the Document Object Model (DOM)?
When a web browser loads an HTML file, it displays the contents of that file on the screen (styled with CSS). But at the same time the web browsers create a “model” to memorize all the elements, attributes, and contents of the file, and the order in which they appear – this representation of the page is called the Document Object Model, or DOM for short.
The DOM provides the information needed for JavaScript to communicate with the elements on the web page. With the DOM, programmers can navigate through, change, and add to the HTML on the page. The DOM itself isn’t actually JavaScript – it’s a standard from the World Wide Web Consortium (W3C) that most browser manufacturers have adopted and added to their browsers. The DOM lets JavaScript communicate with and change a page’s HTML. Here is an example to see how the DOM actually works in an HTML file:
Figure 1
<html>
  <head>
    <title>A tutorial</title>
  </head>
  <body class=”content”>
    <h1 id=”header1”>Headline 1</h1>
    <p>Some<strong>very important</strong>text</p>
  </body>
</html>
On this and all other web sites, some tags wrap around other tags – like the <html> tag, which surrounds all other tags, or the <body> tag, which wraps around the tags and contents that appear in the browser window. You can imagine the relationships between tags as a family tree diagram (Figure1). The <html> tag is the “root” of the tree, while other tags represent different “branches” of the family tree. In addition to HTML tags, web browsers also keep track of the text that appears inside a tag, as well as the attributes that are assigned to each tag. In fact, the DOM treats each of these tags/elements, attributes, and text as individual units called nodes.
Syntax
getElementById()
Getting a tag by ID means locating a single node with a unique ID applied to it. In Figure 1, the <h1> tag has an ID attribute with the value of header1. The following JavaScript selects that node:
document.getElementById(‘header1’)
NOTE: This line means, “Scan this page for a tag with an ID of ‘header1’ assigned to it.” The document part of document.getElementById(‘header1’) is a keyword that refers to the entire document. It is required, so you can’t type getElementById by itself. The command getElementById is the method name and the ‘header1’ part is a string that is sent to the method.
Frequently, you will assign the results of this method to a variable to store a reference to the particular tag, so you can later manipulate it in your program. For example, if you want to use JavaScript to change the text of the headline, you can use this code:
  var headline = document.getElementById(‘header1’);
  headline.innerHTML = “JavaScript was here!”
The getElementById() command returns a reference to a single node, which is stored in a variable named headline. The second line of code uses the variable to access the tag’s innerHTML property: headline.innerHTML, so you can reset the headline.
getElementsByTagName()
If you would like to find every link on a web page and do something to those links, you need to get a list of elements, not just one element marked with an ID. The command getElementsByTagName() will do. This method works similarly to getElementById(), but instead of providing the name of an ID, you supply the name of the tag you’re looking for. For example, to find all of the links on a page, you write this:
var pageLinks = document.getElementsByTagName(‘a’);
NOTE: This line in plain English means, “Scan this document for every <a> tag and store the results in a variable named pageLinks.” The getElementsByTagName() method returns a list of nodes, instead of just a single node. Therefore, the list acts more like an array. For example, the first item in the pageLinks variable from the code above is pageLinks[0] – the first <a> tag on the page – and pageLinks.length is the total number of <a> tags on the page.
You can also use getElementById() and getElementsByTagName() together. For example:
  var banner = document.getElementById(‘banner’);
  var bannerLinks = banner.getElementsByTagName(‘a’);
  var totalBannerLinks = bannerLinks.length;
In the above code, the variable banner contains a reference to a <div> tag, so the code banner.getElementsByTagName(‘a’) only scans for <a> tags inside that <div> instead of the whole HTML document.
JavaScript DOM in D3
The getElementById() and getElementsByTagName() methods in JavaScript DOM are not applied in any D3 code. As the creator of D3 Michael Bostock states, "modifying documents using the W3C DOM API is tedious: the method names are verbose, and the imperative approach requires manual iteration and bookkeeping of temporary state.(d3js.org)" So like jQuery or Prototype, D3 employs a declarative approach, operating on arbitrary sets of nodes called selection. Example:
  d3.selectall("p").style("color", "white");
  d3.select("#viz").style("background-color", "black");
In other words, D3 uses the DOM framework but applies other methods to set attributes and styles, register event listeners, or change text content in an HTML file. Document Object Model (DOM) is still important as a mental model for novice programmers to know better about D3.
CSS
Cascading Style Sheet (CSS) is a system for defining style rules. These rules change the appearance of the elements in a web page, tweaking details like color, font, size, borders, and placement.
Three types of styles
CSS gives you three ways to apply style sheets to a web page:
External: the style sheet is saved in a separate file. This is the most powerful approach because it completely separates formatting rules from your HTML page. It gives you an easy way to apply the same rules to many pages.
  <head>
    <link rel="stylesheet" href="style.css" type="text/css" />
  </head>
Internal: the style sheet is embedded inside a HTML document inside the <head> section. You still have the benefit of separating the style information from the HTML, and you can cut and paste the embedded CSS section from one page to another if you want to. This works best if you want to give someone a complete web page in one single file.
  <head>
    <style type="text/css">
      h1{color: silver}
    </style>
  </head>
Inline: the style rules are inserted directly inside the start tag of an HTML element. This may not be a good idea because formatting details tend to be long. But occassionally you might want to use the inline style approach to apply one-time formatting in a hurry. It is not clean or structured, but it works.
<h1 style="border-style: double; color: orange; text-align: center">Some Title</h1>
CSS rules
Style sheets contain just one thing: rules. Each rule is a formatting instruction that applies to a part of the display of your HTML page. Here is a simple rule that tells a browser to display all <h2> headings in green:
h2 {color: green}
Unlike HTML markup, here are the ingredients that make up every CSS rules:
selector {property: value}
Selector: selector identifies the type of format you want to format. A browser will hunt down all the parts of a web page that match the selector.
Property: property identities the type of formatting you want to apply, like color, fonts, alignment, or something else.
Value: value sets a value for the property defined above. For instance, if your property is alignment, the value could be align center or align left.
You can format several properties at the same time, or create a single formatting rule that affects several different elements:
  h1 {
	text-align: center;
	color: black;
  }

  h1, h2, h3 {color: blue}
How to apply a style sheet
Create the style sheet: create a new file in any text editor, like Notepad or Dreamweaver.
Type the CSS rules into the style sheet: like
Save the style sheet with the name style.css.
Open the index.html file.
Add the <link> element to the HTML file: This <link> element points your browser to the style sheet you wrote for your pages. Here is the syntax:
Save the HTML file and open it in a browser.
h1 {color: orange}
  <head>
    <title>This is an example.</title>
    <link rel="stylesheet" type="text/css" href="style.css" />
  </head>
CSS and D3
HTML and CSS are the backbones of D3 as a JavaScript library. It is almost required to know the basics of CSS well to understand D3.
jQuery for D3
What is jQuery?
jQuery is a Javascript library of functions designed to help the programer to “write less, do more.” jQuery uses a unique syntax that allows for less text to be coded. The jQuery library contains many features including HTML element selections/manipulations and JavaScript effects and animations.
Syntax influence in d3
jQuery was designed for selecting HTML elements and performing an action on them, and d3 takes much of it's syntax from jQuery. In order to do anything with an object in d3 you will first have to select it using the “.select” command and then you can call a specific function on it to then do something with that object.
d3.select('this').text(“some text”)
NOTE: This quick example simply selects the “this” object and gives it the text “some text”. The .select command will only select one item at a time, so if you need to select more items you will need to use .selectall which is explained in greater detail in the d3 Selection tutorial.
Method Chaining
Many of the jQuery methods will also return a jQuery object that can then be used to call another method. This is called Method chaining as it allows the programmer to do many things with a single element by just simply adding another method rather than having to select the object again. This same concept of method chaining is used within d3.
Example:
This:
  d3.select('this').text(“This is just a test”);
  d3.select('this').css(“color”, “blue”);
Can be replaced by this:
d3.select('this').text(“This is just a test”).css(“color”, “blue”);
Or this:
  d3.select('this')
    .text(“This is just a test”)
    .css(“color”, “blue”);
How does it relate to d3?
Much of the syntax of jQuery is shared with d3. Method chaining is a very important part of writing code in d3. d3 does not directly use jQuery, so the jQuery library of functions is not directly accessible in d3 by default. Selections are handled differently in d3 as well, but that will be discussed in detail later.
jQuery Syntax in a d3 example:
The following visualization is directly from the d3 example page. This is a Choropleth design of the United States.
 Source: http://mbostock.github.com/d3/ex/choropleth.html
Below is a code snippet from the above visualization. You can see that the jQuery style of Method Chaining is used quite frequently in this example.
  var svg = d3.select("#chart")
    .append("svg");

  var counties = svg.append("g")
    .attr("id", "counties")
    .attr("class", "Blues");

  var states = svg.append("g")
    .attr("id", "states");

  d3.json("../data/us-counties.json", function(json) {
    counties.selectAll("path")
    .data(json.features)
    .enter().append("path")
    .attr("class", data ? quantize : null)
    .attr("d", path);
  });

  d3.json("../data/us-states.json", function(json) {
    states.selectAll("path")
    .data(json.features)
    .enter().append("path")
    .attr("d", path);
  });

  d3.json("unemployment.json", function(json) {
    data = json;
    counties.selectAll("path")
    .attr("class", quantize);
  });